PepsiGal247 PSP Tutorials

Home | Ocean Horizon Tutorial | PepsiGal247 Tutorial Home Page

Ocean Horizon Tutorial

oceanhorizon1.gif

You Will need the below items for this tutorial.
 
PSP XI or other version here
 
Eyecandy 3 plugin
EyeCandy 4 plugin
 
Sqirlz Water Reflection Program

Alright let's begin!
 
1.Open New Image 700 x 450

newimage700x450.jpg

2.Set foreground color to #fff47d
3.Set Background color to #6c0202
4.Set fore ground to gradient under below settings.
Foreground/Background
Angle:179
Repeat:1
Style:Radial
Invert:Checked
5.Flood Fill with gradient
6.Rename this layer Sky
7.Crop image to 300 x 700 pixels using rulers
8.resize canvas to 700 x 450 pixels
position:Center Top
9.create new raster layer name it Ocean
10.Using rectangle selection tool select transparent area of bottom of image
 

selection1.jpg

11.change your gradient settings to
Angle:179
Repeats:0
Style:Linear
Invert:uncheked
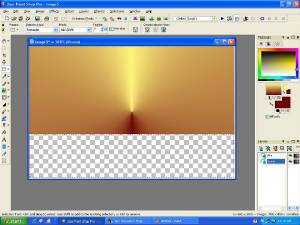
12.Flood Fill selection with gradient
13.Create New raster layer name it Ocean 2
14.set your foreground color to c0c0c0
15.Set your Background color to 808080
16.set foreground to gradient with these settings
Angle:179
Repeats:0
Style:Linear
Invert:Unchecked
17.Flood Fill selection withgradient making sure Ocean 2 is the selected layer
18.go to effects>texture effects>blinds
with these settings
Width:20
Opacity:100
Color:Black
Horizontal:Checked
Light from Left/Top:Checked
19.Using Magic Wand Select Black lines and hit delete key
20.Effect>Plugins>Eyecandy 4>MotionTral>Swoop (from the settings drop down list) click ok
21.Affects>Blur>Gaussian Blur
Radius:100
22.Now go to layer properties for OCean 2
change blend to:Multiply
Opacity to:45
23.Now with your water still selected
(if not slected use your rectangle selection tool to reselect it)
24.now leaving water selected go to selections>Invert>Delete>Invert
25.Merge your Ocean 2 layer down into your Ocean layer
26.click your sky layer
27.Affects>Blur>Gaussian Blur
Radius:100
28.New Raster Layer name it BackGround
29.selection>select none
30.Flood Fill with Your BackGround color #808080
31.Layers>Arrange>Send to bottom
32.click sky layer
33.layers>properties
blend:multiply
opacity:74
34.Layers>Merge>Merge flatten
35.save as jpeg
36.open up sqirlz
37.Open image in sqirlz by clicking green folder icon
38.click on customize basic ripples icon
check boost wavelength
39.click add flow
set flow direction to 359
hit red x in top right corner
hit re x in top right corner
39.click start creating outline button

selectstartcreatingoutlinebutton.jpg

40.Outline water area and right click when at end to end the tool
41.Then Click Run Animation Button
(THE YELLOW ARROW ON IT)
a message will pop up click ok
42.you should now see your Ocean moving
43.Now we are going to save so click the
botton marked gif
another message box will pop up click ok again
44.Set your frames to 45
and click ok
 
That's it!!!
Now that you've got the hang of it you can play using different colors or even different plugins! Sky's the limits!
Hope you enjoyed this tutorial!
If you have any problems with this tutorial please feel free to email me at PepsiGal247@yahoo.com

All content on this page is copyright PepsiGal247
Unless otherwise stated. Any resemblance to someone else's work is purely coincidental.
If you would like to share these tutorials
or would like to use these tutorials for other
than personal learning experiences Please contact
PepsiGal247 at
PepsiGal247@yahoo.com for permissions and procedures. Also please DO NOT try to use content in my tutorial claiming it as your own. Also any content posted on my page that is not of my own creation has special permissions from the creator to be used on my page and in my tutorials.Therefore if you would like to use the content you will need to contact the original creator for permissions to use their creations. Creators info will always be stated at the bottom of the tutorial page or on the creation and a link to contact them will be posted when the creator approves a link posted. Thank You and
Enjoy the site and tutorials!